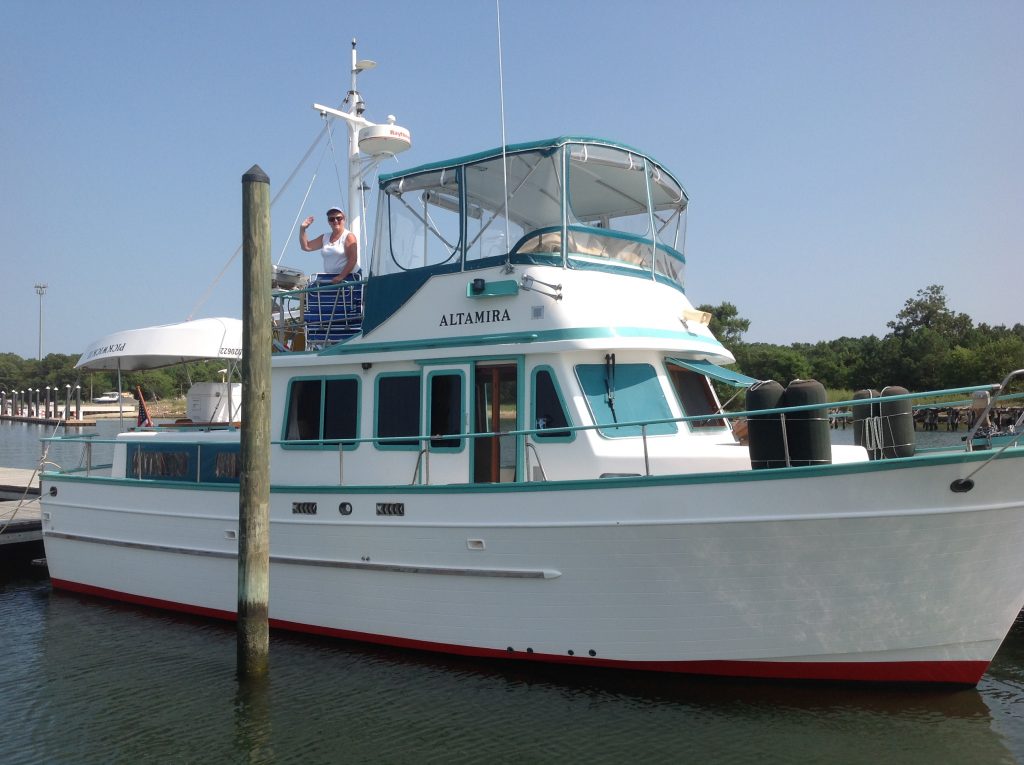
The older Taiwan built trawlers (including Altamira, our 1989 Marine Trader 38 Double Cabin) have been built with extensive teak exterior trim – which was the style back in that day. Everything on the exterior that is not fiberglass, stainless steel, or window glass is made of teak – including the bulwark cap and railings, window and door frames, cabin doors, bow pulpit, gratings, bridge trim, companionway hatches, and the deck main deck overlay.
In my opinion, here in Tidewater Virginia USA, bright coatings for mahogany and teak that cannot be kept covered or under cover are not practical. I base my opinion on the amount of labor required to maintain these woods to yacht standards. But opinions do vary. If just letting the teak weather to gray doesn’t suit you either, here is a multi-year to completion low maintenance approach that has worked for me and looks great.
We chose to keep some trim bright (the fore-deck hatch and the aft cabin companionway have boat canvas covers) until later years, after work on the exposed trim was complete. The previous owner had applied many coats of Cetol Natural Teak w/ gloss topcoat to these hatches around 2007, and, since these items were usually covered, they are still serviceable; no peeling, just a bit of gray where the frames join the deck/cabin fiberglass.
As best I can estimate, the rest of the exterior teak was done same as the hatches around 2007, the year we bought the boat. By 2009, problems were beginning to appear. The quality of the exterior teak joinery on Altamira is exceptional, but the piece joins on the bulwark cap, railings, and bridge trim will “work” with the rest of the boat while underway no matter what. So, over time, at every joint, the Cetol coating cracks. Then, water gets under the coating and darkens the finish and causes the coating to lift. At the same time, the thick dark Cetol coatings on the rest of the horizontal surfaces are suffering under the UV from the sun and are lifting/peeling everywhere. This was the situation by 2011.
The conventional wisdom regarding maintenance of Cetol finishes is touch-up as needed. It may well be because of the application process used or other factors, but that approach did not work for us. There was no practical repair short of wooding out everything and starting over if we wanted to stay with the Cetol products. We tried a different tack.
The work took 3 years part-time and was complete 2014. There is a lot of teak on a Marine Trader 38DC and some of it is hard to reach for those of us who are not young. Because I am not young, and because we use the boat frequently, I chose to complete work on a fairly small section of teak before moving on to the next section. It is easier to schedule and maintain workmanship doing smaller bits. We completed 5-6 sections each year.
The process on each section: prepare the surface, tape the gelcoat adjoining the surface, apply epoxy barrier coat (usually the only primer needed), after epoxy cure, apply 2-3 coats polyurethane paint, remove the tape. 2021 edit: I mixed a custom color. A suitable color 2 part linear polyurethane coating (much longer time between re-application) was not available at the time.
This process is a lot of labor, quality materials are not cheap, and big mistakes are hard to correct. USE QUALITY MATERIALS. Work early morning only in hot weather. Use quality blue painter’s tape – DO NOT USE PLASTIC/”PROFESSIONAL” TAPE – the epoxy kills the adhesive and makes a big mess. Tape 1/16″ onto the gel coat and the paint will help seal the wood to gel coat joint gap. This works for window glass to frame joints as well. Endeavor to not do more surface preparation than is needed to achieve professional results. On our boat, 95% of the unfinished teak required only light hand sanding with 60 grit to provide tooth for the epoxy. Mysteriously, 6 linear feet of the bridge trim had deteriorated to the point where a sanding type epoxy filler was required to get those boards smooth. I hand sanded the cured epoxy with 80 grit to get a tooth for the polyurethane – We did not sand the poly between coats.
We used West 105 epoxy and 206 hardener for the barrier coat/primer. The viscosity of this mix laid out fine and the tendency to run on vertical surfaces was not frequent. I did thin the mix with lacquer thinner 15-20% – something you should never do with epoxy in a structural application. Endeavor to let the epoxy cure for 72 hours before applying the polyurethane – the poly will stay tacky for days (but will eventually dry) if you rush the epoxy cure. In warm weather, the epoxy was OK to sand after 24 hours.
We applied the epoxy with 2″ disposable bristle brushes. THERE WILL BE BUBBLES AND RUNS IN THE EPOXY. This is not a big deal because the epoxy stays “wet” for hours after application. Wait 30 minutes and brush the bubbles out and brush any runs out. Repeat this 30 minutes later if necessary – the goal is to eliminate/minimize having to sand the epoxy free of bubbles and runs after it cures. The epoxy, when “toothed” for the poly, need not be car finish smooth; properly applied, 2-3 coats of poly will come out professionally smooth and glossy. Experiment to determine how un-smooth the sanded epoxy (80 grit) can be and still be professionally smooth after painting. Believe.
We applied the poly with a 2″ high quality bristle brush – I cannot over-stress the importance of quality brushes for the poly. I thinned the first coat 10% and the second 15% using the correct reducer (Interlux Brightsides paint and Interlux 333 reducer). 24 hours minimum between coats – do not apply paint in the bright sun or to hot surfaces. I mixed a custom “turquoise” color (50% Brightsides Kelly (dark) green and 50% Petit Blue Ice light blue). I suggest keeping the trim color to the lighter side – this will help maximize the approximately 3 years time before a (thin) maintenance coat is required if you want to maintain gloss. The horizontal surfaces are way more UV stressed and need maintenance sooner; the window frames will be OK for 10 years. To date, there has been not one instance of any peeling, cracking, or lifting. On our boat, those horizontal surface areas completed in 2012 need/will get a maintenance coat for the 2016 season. We gave away the rest of the Cetol. It is a fine, quality product, but for us, we have too much teak to maintain to make practical use of it.